Going Live
Once you've hit Start Streaming in your software.
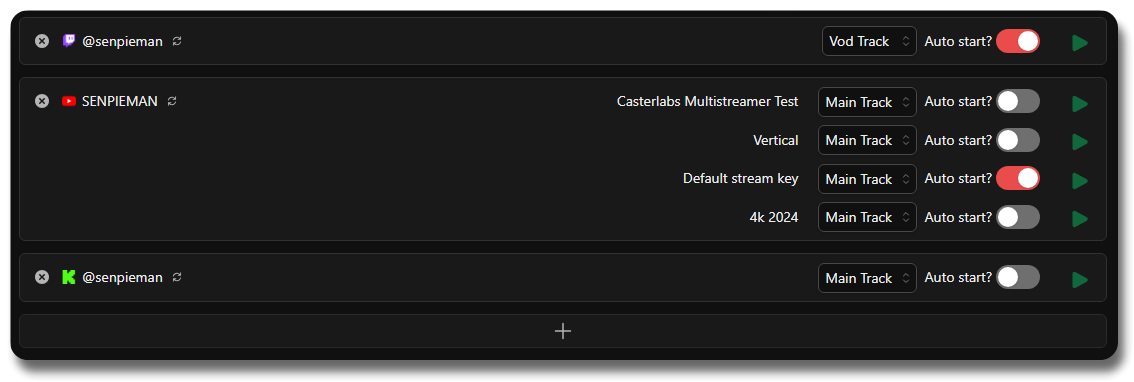
From the Casterlabs-Multistream Dashboard you can select which platforms you want to stream to by clicking on the green Play button. However, you can also toggle Auto Start. This will immediately connect you to the service(s) you've selected from the moment you start streaming
If mid-way through your broadcast you decide you no longer want to be live on one of your platforms, you can hit the red Stop button and this will terminate the stream to that particular site; whilst still keeping you live on all the others.
At the end of your stream, just hit Stop Streaming in your software and all your connections will terminate.
Platform Bitrate Recommendations
Each platform has its own recommended bitrate settings for both video and audio. Below is a table outlining the supported bitrate ranges for each of the major platforms we support:
| Platform | Reccomended Bitrates | Audio Bitrate Range | Reference |
|---|---|---|---|
| Twitch | 3000 - 6000 Kbps | 128 - 320 Kbps | Twitch Support |
| YouTube | 3000 - 400000 Kbps | 128 - 320 Kbps | YouTube Help |
| Kick | 1000 - 8000 Kbps | 128 - 320 Kbps | Kick Support |
| Trovo | 4000 - 6000 Kbps | 128 - 320 Kbps | Trovo Support |
| Custom RTMP | Varies by Platform | Varies by Platform | Varies by Platform. |
Enable VOD Track
If you are using Meld Studio as your streaming software, you will not need to update your Stream URL to include the VOD track suffix. Meld Studio natively supports this feature. You can check out their documentation for help setting VOD tracks up in Meld Studio here.
Casterlabs-Multistream now supports the Twitch VOD track functionality. Meaning that if you enable this option, your stream will be recorded as a VOD on Twitch, but will only use the audio track you have selected. This is particularly useful for streamers who wish to provide a different audio experience for their live viewers compared to their VOD audience, such as excluding music tracks that may be copyrighted.
This guide will walk you through the steps to enable the VOD track for your Twitch streams using Casterlabs-Multistream. If you are using OBS Studio as your streaming software, additional configuration steps are required to ensure that the VOD track functions correctly. You can find out more by reading their documentation on the VOD track feature here.
Enabling VOD Track in Casterlabs-Multistream
To enable the VOD track for your Twitch stream, follow these steps:
- Navigate to the Casterlabs-Multistream Dashboard.
- Locate the Twitch platform in your list of streaming targets.
- From your Twitch output settings, select the "VOD Track" option from the drop-down (see image above).
- Start your stream as usual.
Configuring OBS for VOD Track
To ensure that OBS is set up correctly for Twitch VODs, you may need to adjust some settings in the obs-studio.ini file. Here are the recommended configurations:
From your OBS appdata folder, you will need to edit two files.
The first is golbal.ini and the second is user.ini.
You will find these files in the following folder on your OS:
- macOS:
~/Users/USERNAME/Library/Application Support/obs-studio - Windows 10/11
%appdata%\obs-studio - Linux:
~/.config/obs-studio
Navigating to the OBS AppData Folder
The quickest way to navigate to the OBS AppData folder is to open OBS and go to Help > Log Files > Show Log Files. This will open the folder where OBS stores its log files, and from there, you can navigate up one level to find the obs-studio directory containing the global.ini and user.ini files.
Under both [General] headings in each of these files, there should be a key called EnableCustomServerVodTrack. You will need to set this to =true in both files.
EnableCustomServerVodTrack=true
Which should make the sections look like this:
In user.ini:
[General]
Pre19Defaults=false
Pre21Defaults=false
Pre23Defaults=false
Pre24.1Defaults=false
ConfirmOnExit=true
HotkeyFocusType=NeverDisableHotkeys
YtDockCleanupDone=true
FirstRun=true
EnableCustomServerVodTrack=true
In global.ini:
[General]
MaxLogs=10
InfoIncrement=-1
ProcessPriority=Normal
EnableAutoUpdates=true
BrowserHWAccel=true
LastUpdateCheck=0
InstallGUID=81467601e577ba14151d83115299ac405eb95131
SkipUpdateVersion=0
LastVersion=536870913
EnableCustomServerVodTrack=true
Before making these changes ensure that OBS is closed and not running. If you make these changes while it is open it will overwrite the changes you've made when you close it.
The VOD track function works best with the latest version of OBS Studio. Ensure that you are using OBS Studio version 31.0 or higher to take full advantage of this feature.
Updating your Stream URL
In order to send your stream to Casterlabs-Multistream with the VOD track you will need to update your Stream URL in your streaming software, removing the /live suffix and replacing it with /icanhazvodtrack.
Troubleshooting
If you encounter any issues while going live, consider the following troubleshooting steps:
- Ensure that your streaming software is correctly configured to send the stream to Casterlabs-Multistream.
- Check your internet connection to ensure it is stable and has sufficient upload bandwidth.
- Verify that the platforms you are streaming to are not experiencing outages or issues.
- Review the Casterlabs-Multistream Dashboard for any error messages or notifications.
Further help can be found by hopping in to our Discord server where our Support Team and Community will be happy to assist you!